
Mastering the Art of Frontend Engineering: Your Definition of Done

Engineering excellence isn’t about coding faster—it’s about coding smarter. The difference between good frontend engineers and exceptional ones isn’t the volume of code they write, but the structured discipline they bring to every feature. This discipline starts with understanding what “done” truly means.
The Definition of Done (DoD) is more than a checklist—it’s a shared agreement within your team on the exact criteria a feature must meet before it can be considered complete. When implemented properly, it transforms how teams estimate, deliver, and maintain quality while eliminating the costly cycle of rework and production bugs.
What is Definition of Done and Why It Matters
A Definition of Done creates transparency and consistency across your entire team. It’s a formal description of the state your code must reach before it’s truly finished—covering everything from functional requirements and code quality to testing, documentation, and deployment verification.
Why DoD drives engineering excellence:
- Prevents incomplete work from progressing: No more “90% done” features that take another week to actually ship
- Improves estimation accuracy: When everyone understands all the steps required to complete a task, sprint planning becomes predictable
- Reduces technical debt: By ensuring testing, documentation, and code reviews happen before marking work complete
- Eliminates ambiguity: Creates a shared language between developers, product owners, and QA about what “complete” means
- Increases team alignment and trust: Everyone knows the standard they’re working toward
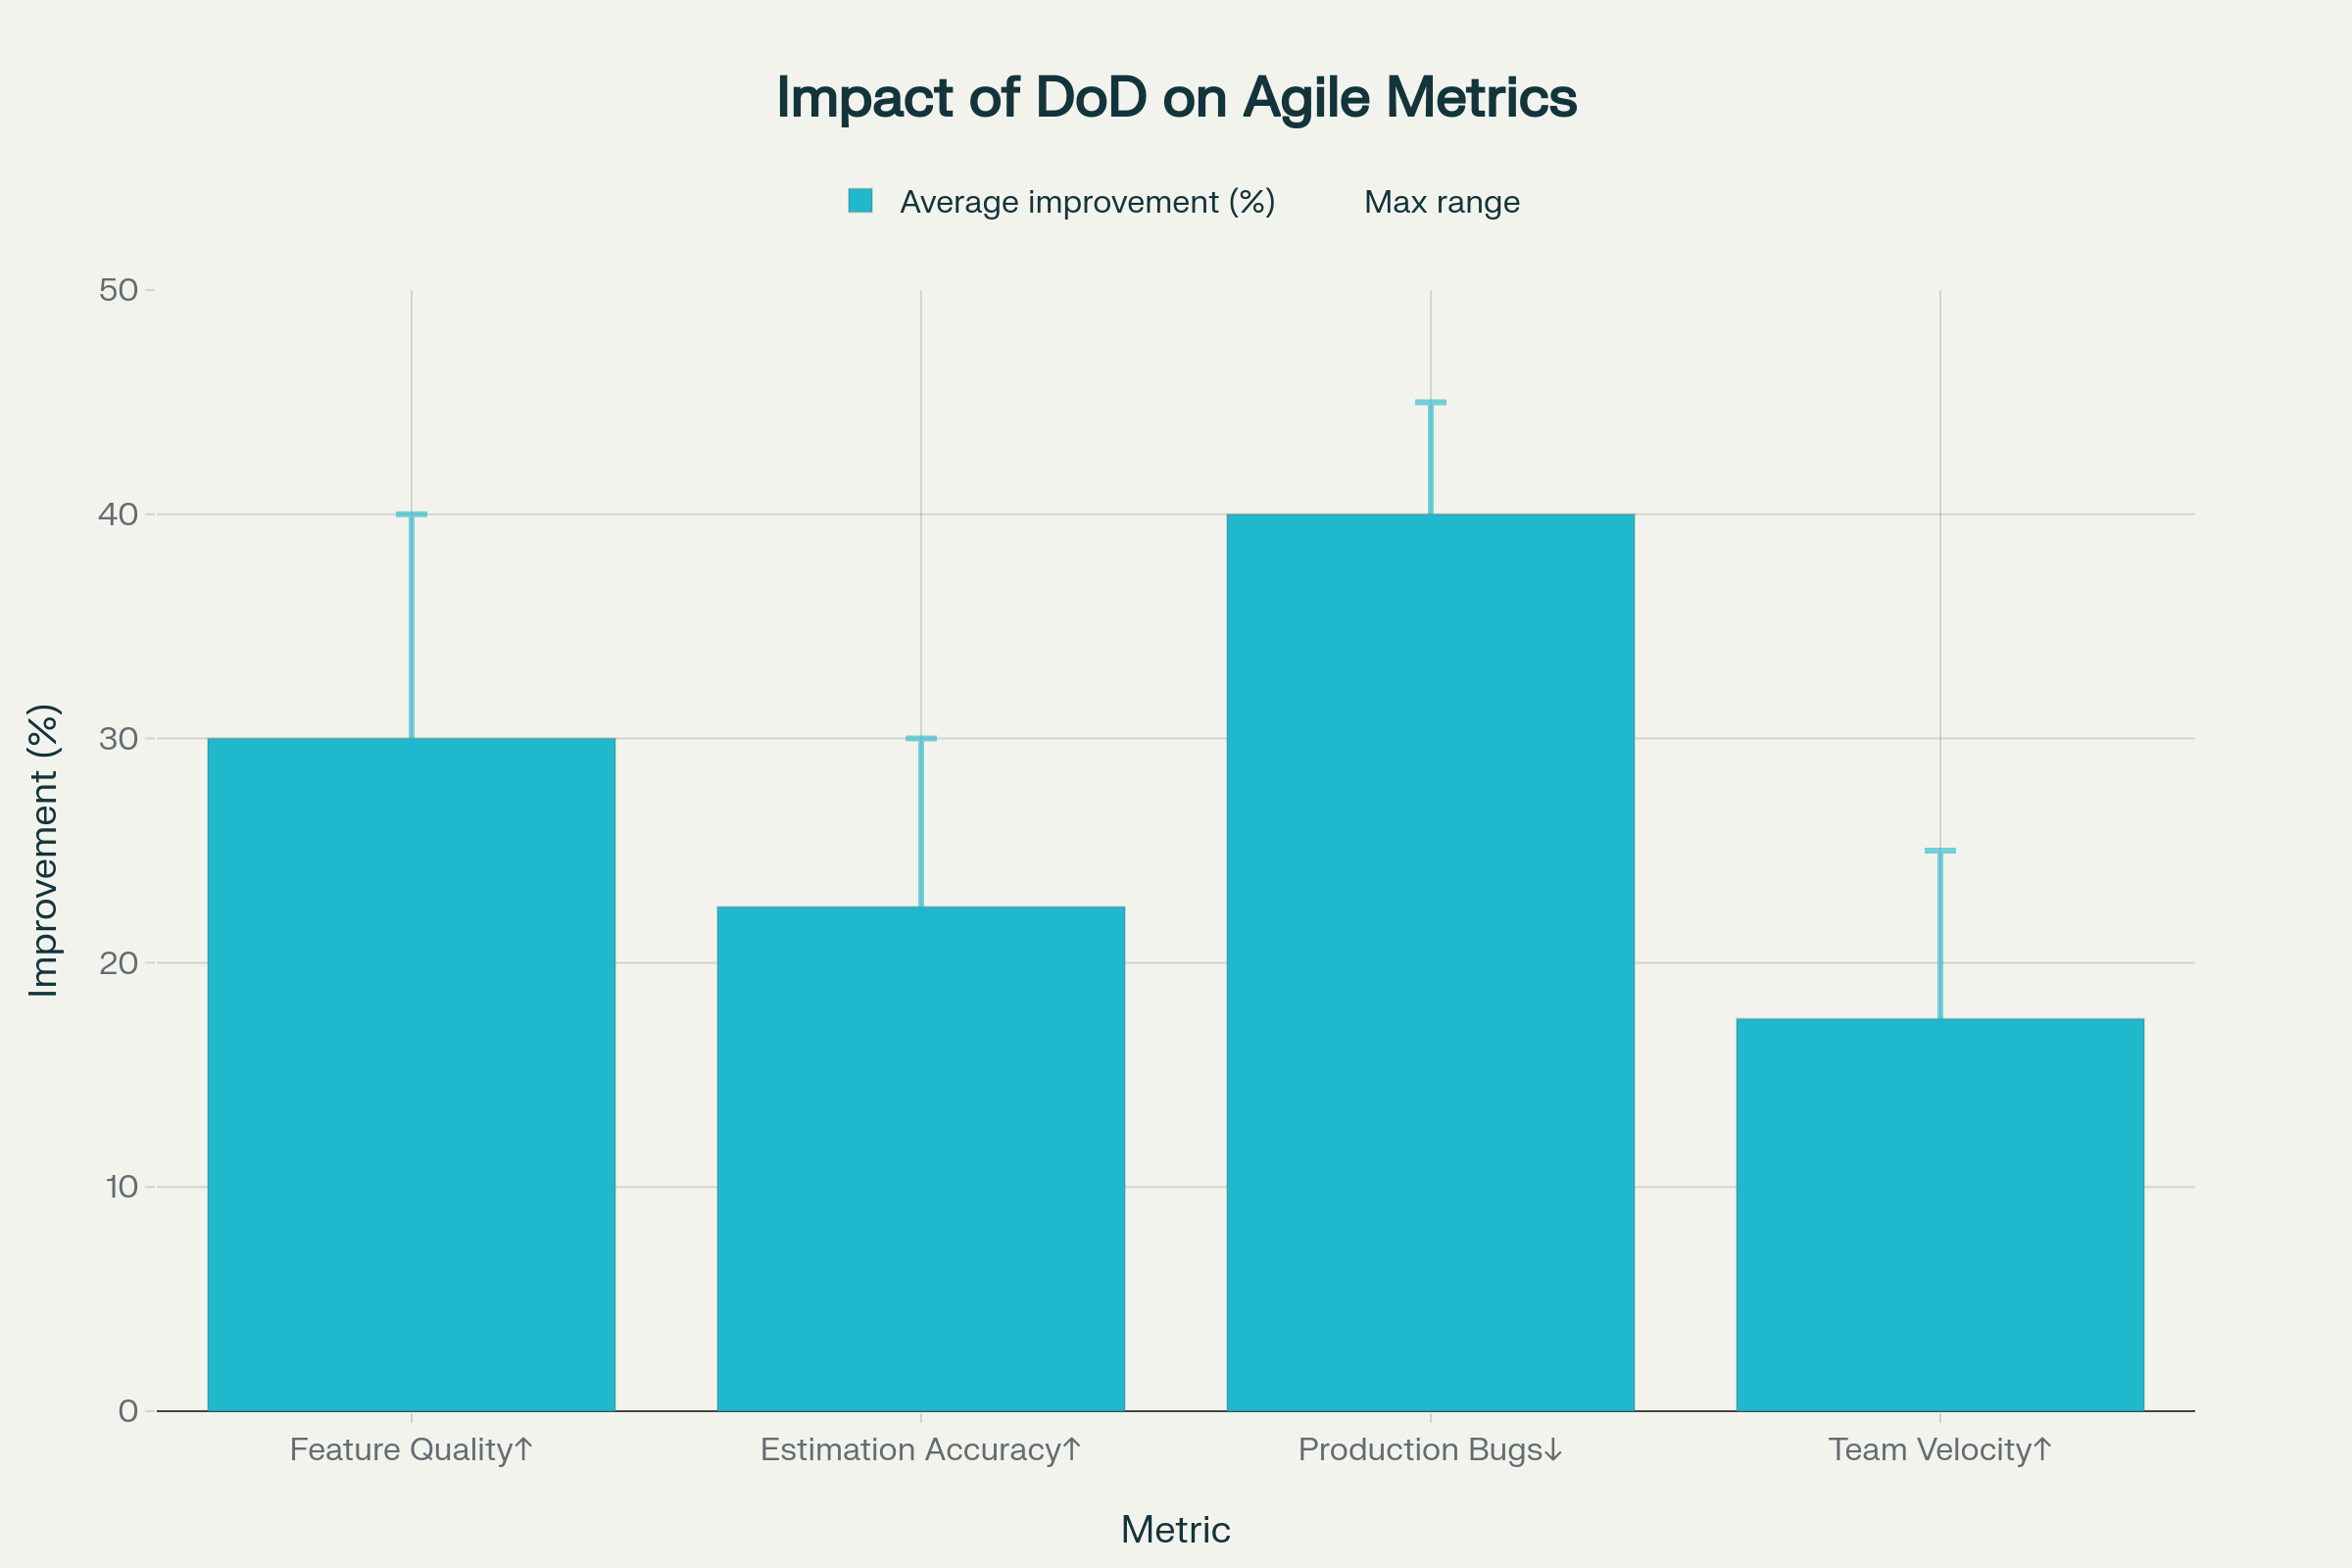
This chart is based on aggregated best practices and case studies from agile engineering literature, industry reports, and practical team retrospectives that show implementing a thorough DoD checklist consistently improves these metrics by 15-45% or more, depending on the team’s maturity level.
Before the Start of Development: Planning That Prevents Chaos
Exceptional engineering starts before the first line of code. This pre-development phase is where you identify impact areas, build architectural models, and create realistic estimates.
1. Comprehensive Requirements Review
Read the entire Product Requirements Document (PRD) from start to finish. Don’t skim—understand the business context, user problems being solved, and success metrics. Flag any ambiguities or gaps immediately.
Go through (Figma) designs for the entire feature, not just your assigned component. Understanding the complete user journey helps you identify shared components, consistent patterns, and potential edge cases that designs might not explicitly show.
2. Test Case Analysis and Scenario Building
Review existing test cases provided by QA or product teams. These represent the baseline expectations but are rarely complete.
Build additional scenarios that might have been missed. Think about:
- Edge cases: What happens with empty states, maximum character limits, slow networks, or API failures?
- User paths: How might users navigate differently from the “happy path”?
- Cross-browser and device considerations: Will this work on Safari mobile? What about accessibility with screen readers?
- Concurrent user scenarios: What if multiple tabs are open? What if data updates while the user is mid-action?
Document these scenarios—they become your personal acceptance criteria and form the foundation of thorough testing.
3. Architecture Model and Technical Design
This step separates engineers who deliver fast from those who deliver well.
Create an architecture model that visualizes:
- Flow of the code: How does data move from API → state management → components → UI?
- File structure and naming conventions: Which directories will you create? How will files be organized to stay maintainable?
- Reusable functions and utilities: What logic can be extracted and shared? Where does business logic vs presentation logic live?
- Reusable components: Which UI elements should be built as shared components now versus later?
Identify integration points and dependencies. Which APIs will you call? Which Redux slices or React Context will you modify? What third-party libraries might you need? Document these now so you don’t discover blockers mid-sprint.
Map impact areas throughout the codebase. Will this feature affect authentication flows? Navigation? Other teams’ features? Understanding ripple effects prevents surprise regressions.
4. Task Breakdown and Subtask Creation
With a clear architecture in place, break the feature into atomic subtasks. Each subtask should be independently testable and small enough to complete in a few hours.
Examples of good subtasks:
- Create API service layer and mock responses
- Build a reusable Button component with loading states
- Implement form validation logic with unit tests
- Wire up Redux actions and reducers
- Add error boundary and fallback UI
- Integrate analytics tracking
5. Realistic Estimation
Now you can provide accurate estimates based on your architecture and subtasks. Break down each subtask with time for:
- Implementation
- Unit and integration testing
- Code review feedback cycles
- Documentation
- Dev environment testing and QA handoff
Add buffer time for unknowns—seasoned engineers know that estimates are ranges, not guarantees. But the error margins should be sub 15%
During Development: Local Testing is Your First Gate
Complete Testing on Your Local Machine
Before you ever push code or deploy to dev, conduct thorough testing locally. This is where you catch 80% of bugs before they waste anyone else’s time.
Your local testing checklist:
- All functionality works as designed—test every user path
- Error states render correctly—test network failures, validation errors, empty states
- Console is clean—no errors, warnings, or unnecessary logs
- Accessibility basics—keyboard navigation works, focus states are visible, screen reader compatibility
- Cross-browser testing—at minimum, test Chrome, Safari, and Firefox
- Responsive behavior—test mobile, tablet, and desktop breakpoints
- Performance—no excessive re-renders, images are optimized, bundle size is reasonable
Run your automated test suite locally: unit tests, integration tests, and any E2E tests. All tests must pass before you push.
After Development: The Critical Testing Phase
Deploy to Dev and Test Like a User
Once you’ve given yourself the green light locally, deploy to the dev environment and repeat your testing there. Dev environments often expose issues that don’t surface locally—different environment variables, real API integrations, database configurations, and network conditions.
Here’s the crucial part: Remove your developer hat and put on your user hat. This mental shift is essential. Stop thinking about how the code works and start thinking about whether the experience makes sense.
Test the complete feature flow in dev:
- Does the feature work end-to-end with real data?
- Are loading states intuitive and informative?
- Do error messages help users understand what went wrong and what to do next?
- Is the UI responsive and performant on different devices and connection speeds?
Regression Testing: The Non-Negotiable Step
After testing your feature, perform regression testing on the rest of the application. This is where you catch the unintended consequences of your changes.
Why regression is critical: Modern frontend applications are interconnected webs of components, state, and side effects. Changing one piece can break another seemingly unrelated area.
Focus your regression testing on:
- Core user flows—login, navigation, key actions
- Areas that share code with your changes—components, utilities, state management
- Features that depend on the same APIs or data structures
This step catches bugs before they reach QA, production, or worse—your users.
Handling Dependencies and Blockers
If your feature has dependencies on other teams, APIs, or services, it’s your responsibility to drive those to completion. Engineering ownership means:
- Following up proactively, not waiting to be unblocked
- Testing integrations as soon as dependencies are ready
- Validating that the dependency actually solves your need before marking your work complete
Don’t give a green light until dependencies are integrated and tested in your feature context.
Bug Fixes: Apply the Same Rigor
When bugs are raised—either in QA or after deployment—follow the full process again:
- Understand the root cause before coding a fix
- Review test cases and scenarios related to the bug
- Implement the fix with appropriate tests to prevent regression
- Test locally, deploy to dev, verify the fix, and perform regression testing
Bugs are often more dangerous than new features because they touch existing, working code. Treat them with extra care.
Post-Production: The Final Validation
Production Sanity Testing
After your feature deploys to production, perform a sanity test to ensure everything works as expected in the live environment. Production has unique characteristics—real user data, production APIs, CDN caching, third-party integrations—that can surface issues not seen in dev or staging.
Your production sanity checklist:
- Core feature functionality works with real production data
- No console errors or warnings
- Analytics events are firing correctly
- Performance is acceptable under real-world conditions
- Third-party integrations (payment processors, authentication, analytics) work correctly
Monitor production for the first 24-48 hours after deployment. Watch error tracking tools, user analytics, and support channels for any unexpected issues.
Your Complete Definition of Done Checklist
Here’s a comprehensive DoD that synthesizes industry best practices with the workflow outlined above:
Pre-Development
Development
Local Testing
- All functionality tested locally across user paths
- Error states, edge cases, and validations tested
- Console is clean (no errors or warnings)
- Accessibility tested (keyboard navigation, screen reader)
- Cross-browser compatibility verified
- Responsive design tested on multiple breakpoints
- Performance acceptable (no excessive re-renders, optimized assets)
Code Review
Dev Environment Testing
Documentation
Dependencies and Blockers
Production Deployment
Making DoD Stick: Implementation Tips
Start with a team workshop to collaboratively build your Definition of Done. When the team creates the DoD together, everyone understands and commits to it.
Make it visible—print it, pin it to your team board, include it in your project management tool, reference it in sprint planning. The DoD should be impossible to ignore.
Integrate it into your workflow—use it during sprint planning for estimation, during development as a checklist, and during retrospectives to discuss adherence.
Iterate and improve—your DoD should evolve as your team matures and as your product complexity changes. Regularly review and refine it based on lessons learned.
Automate what you can—use CI/CD pipelines, linting, automated testing, and deployment scripts to enforce parts of your DoD automatically. The less you have to remember manually, the more consistent you’ll be.
The Payoff: Predictability, Quality, and Velocity
Teams that adopt a rigorous Definition of Done experience dramatic improvements:
- Estimations become accurate because everyone understands the full scope of “done”
- Quality increases as technical design is done before coding starts, and issues are caught earlier, and rework decreases
- Velocity improves because you spend less time fixing production bugs and more time building new value
- Trust builds between engineering, product, and QA as deliverables consistently meet expectations
- Onboarding accelerates for new team members who can reference a clear standard
Most importantly, you shift from reactive bug-fixing to proactive quality engineering. You stop asking “why does this keep breaking?” and start confidently shipping features that work.
Conclusion: Discipline Creates Freedom
The Definition of Done isn’t bureaucracy—it’s liberation. It frees you from the anxiety of wondering if you’ve forgotten something, from the frustration of estimates that are always wrong, and from the exhaustion of constant firefighting.
By mastering this structured approach—planning before coding, testing thoroughly at every stage, and validating in production—you transform from a code writer into a complete software engineer. You deliver features that work, estimates that hold, and code that lasts.
Start with your next feature. Before you write a single line of code, walk through the pre-development checklist. You’ll be amazed at how much smoother everything flows when you’ve done the thinking upfront.
Excellence in frontend engineering isn’t about natural talent—it’s about disciplined process. And that process starts with knowing exactly what “done” means.
Resources You’ll Love:
“The Art of Agile Development” by James Shore and Shane Warden